 Skip to content

With over 300 million users Worldwide and an average of 70 million photos uploaded every day, it can be hard to cut through the huge amount of content posted on Instagram.
The platform has made it far more accessible and affordable for people who have an interest in photography to share their images, resulting in both an increase in competition and quality of photographs.

At Digivate we aren’t keen on doing things unless they’re done well. It wasn’t worth setting up a company account unless we had a clear strategy, which is what we created in March of this year. You can check out our profile here – @Digivate_Insta
In just two short months we have learnt a ton about both the platform and photography in general. It’s become a big part of the agency’s way of communicating our company culture and has helped me personally when creating content for clients.
Since setting up the account we now have a separate Google Docs page to share tips within the company on how to make the most of Instagram, we thought we’d share it with you guys.
Below is our complete guide to Instagram; tips on photography, tools to use and people to follow. Enjoy!
These tips are designed to begin with the basics and work up to a more advanced level. If you’ve got any more advice, get in touch and we’ll include them in the post. Most of the photos in the post were taken by my colleague Steve, you can follow him at @theonlywhite. You can keep up to date with other social media news on my Twitter profile, @T_Channell.
#1. The Rule of Thirds
If you were taking a photography class, chances are that one of the first things you’d learn would be the Rule of Thirds.
The first stage of the rule of thirds is to segment your photo into nine equal areas (see below). Once you’ve done that, you can ensure that the main subject/s of the photo are as near the intersections as possible in order to draw the viewers’ attention.
For a natural image, place the subject of the photo away from the centre of the photo.

How can you apply this to your Instagram photos? In almost all of the photos we have created we have needed to crop the image before posting, in order to ensure that everything is aligned. Add gridlines to your image and adjust the photo accordingly, remembering this basic photography principle.
Instatip:
When the Rule of Thirds is applied correctly, you will have created an image which has a nice balance throughout and does not seem too busy or complex. It’s a fundamental principle in photography which will immediately impact the quality of your photos.
Breaking this rule
Rules are made to be broken, and this principle is no different. Occasionally you’ll want to experiment with new styles of photography where the Rule of Thirds is not applicable. Take the image below as an example:

If we were to split this photograph up into nine sections, only three would actually contain anything other than the skyline. This image is an example of how you can draw attention to one element of a particular scene, it also expresses the vastness of both the ocean and sky through it’s use of space.
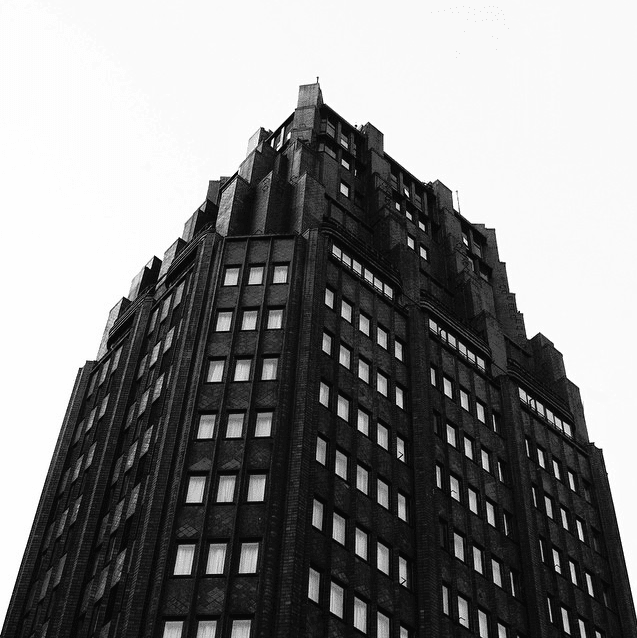
Alternatively, you can break this rule when taking photos of symmetrical images, like in the photo below.
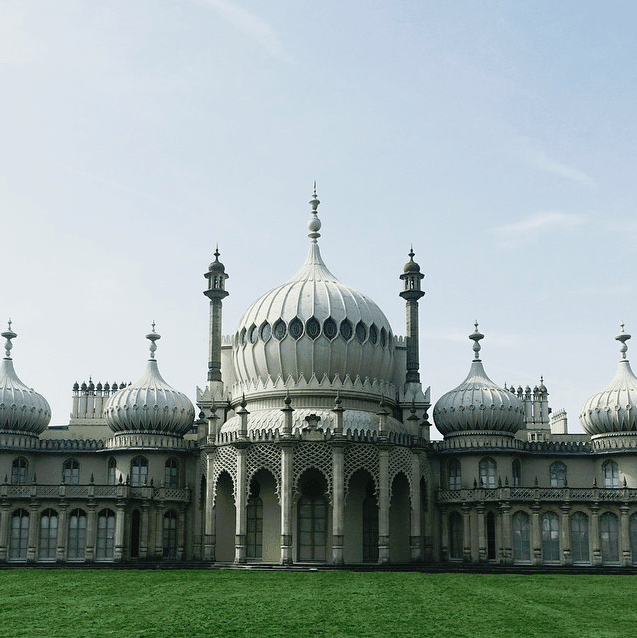
This photo is another good example of how to break the Rule of Thirds. Instead of focussing on the complexity of the building, the photo emphasises its beauty through symmetry. The main part of the building is placed in the centre of the photo, drawing the viewer’s eye to the dome and spire.
Of course, some elements of the Rule of Thirds still remain. The photo can still be separated into three horizontal sections (grass, building, sky) and the vertical pillars provide balance. In most cases, a photo will rely on the Rule of Thirds to some extent.
Insta-tip:
Don’t always follow the rules, see them more as guidelines. If there’s a photo which you feel looks better without applying the Rule of Thirds, go for it.
#2. Make use of space
There can be a temptation to always cram as much into your photo at once, do not do this. Instead, use space to direct the viewer’s attention.
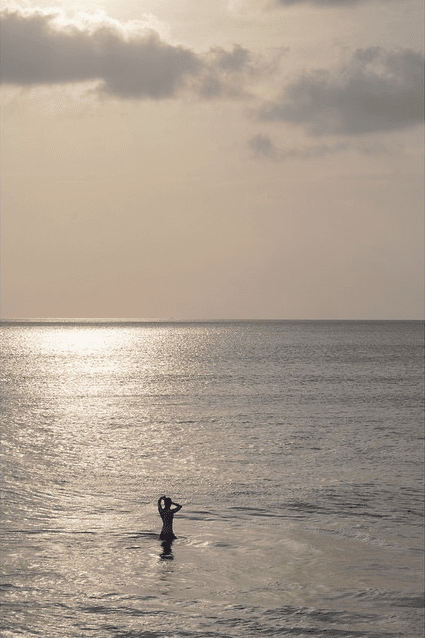
Space can be your greatest friend in photography. If the subject is not looking directly into the camera, it’s generally advised to create space in the direction he or she is facing.
In the image above, the viewer’s eye is firstly directed to the subject near the bottom of the image, then led upwards to the seascape and sky with the horizon as another focal point. Even though there is only one subject, the use of space in this photo gives the viewer two distinct focal points.
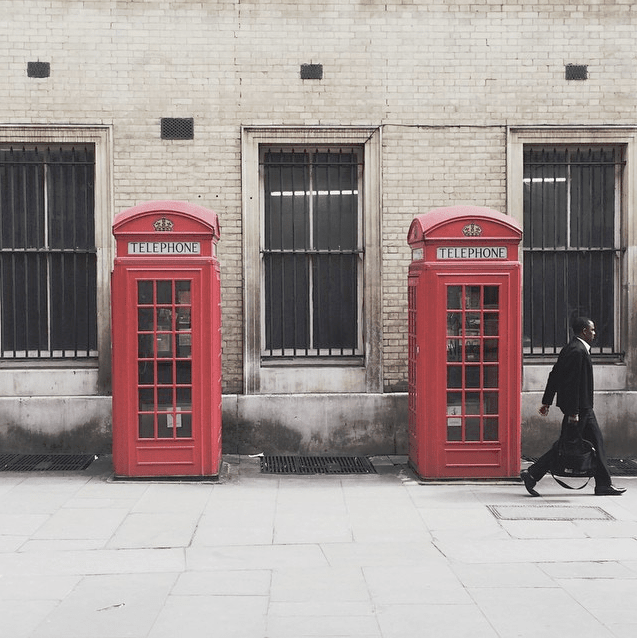
Using space in photos where the subject is moving is particularly important, particularly knowing the difference between active and dead space.
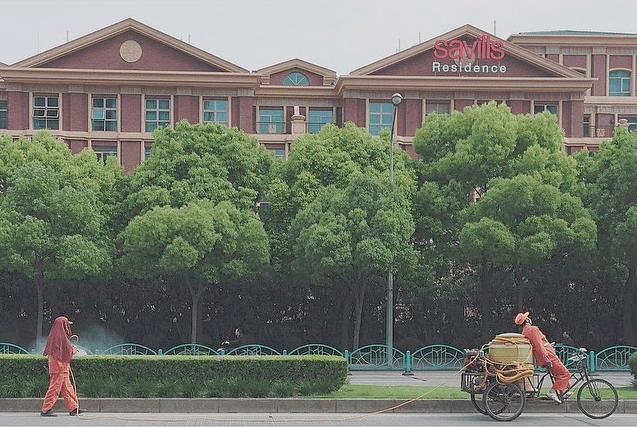
In the image above, the dead space is to the left of the man walking, the active space is everything to the right of him.
Any time you are taking a photo of a moving subject, create active space in the direction that the subject is moving towards. This will create a natural flow to your photos and you will be able to dictate where the viewer’s gaze leads.
Break this rule occasionally
Sensing a pattern here? Although these rules are generally worth following, it is worth breaking them every once in a while, like in the photo below.
Here the subject has almost no active space in the direction he is walking, creating the sense that he is walking with purpose. Not following these rules all the time will diversify your Instagram profile and give your photography some necessary variety.
Insta-tip:
You’ve seen some good examples of how to use space in photography. No one wants to see 300 close up selfies on your Instagram profile, mix it up and make some space!
#3. Lead the eye
This is another fundamental rule of photography. If there is a single subject in the photograph, it makes sense for you to ensure you are directing the viewer’s gaze in that direction. There are a number of ways in which you can do this.
Use your surroundings
Get into the habit of using the landscape around you to your advantage.
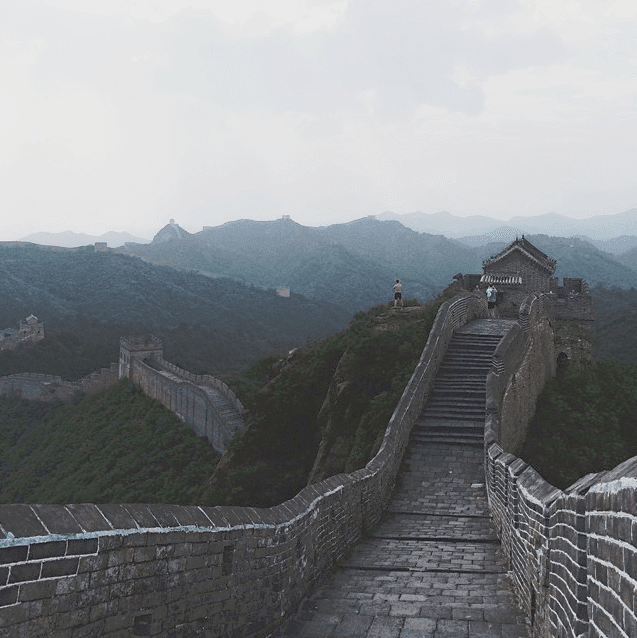
Roads, fences, railway tracks and, in this case, walls can be used to direct the viewer’s attention to the subject. If we cropped out the bottom third of this image there would be no focal point and the photo would not be as striking. For indoor shots apply the same method but use beams, floorboards and tables to lead the user’s eye.
Use Depth of Field
Depth of Field is another fundamental concept in photography which you should get accustomed to applying. It is defined as the distance between the nearest and farthest objects in a scene that appear acceptably sharp in an image.

Depth of field allows you to draw attention to a subject, so the method is particularly effective when you are trying to draw the viewer’s eye to one location.
The main issue when applying this to Instagram photography is that depth of field is harder to create on phones than it is on a DSLR camera. Dave Johnson has written a great article on how to work around this issue, you can find it here.
Make use of space (again)
As we’ve previously discussed, you can use space to both direct attention to a subject or, in this case, amplify a particular subject within a photograph.
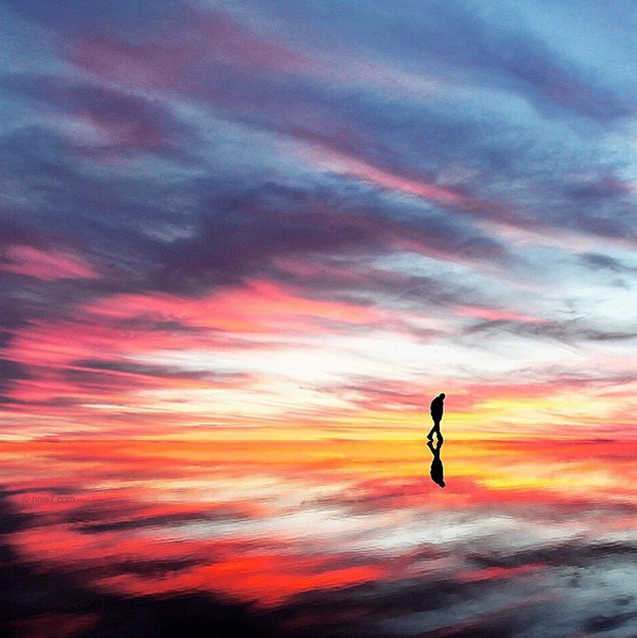
Here your eye is immediately directed to the man’s silhouette. Using bold contrast in images is one of the simplest ways to dictate focus on a particular part of a photo.
There are other elements of this photo which help focus the attention on the subject. Notice that both the skyline and reflection on the bottom of the image all lead you to the same direction, the man walking. Using lines and direction within photography is another really important concept, and leads us on to our next tip.
Insta-tip – Although this might seem like an obvious technique, keeping your thought process on where the viewer’s eye will be directed to is really important. When taking wide-angle shots, try to think about the main elements of the photograph you want to focus on and use the techniques discussed above to do that.
#4. Make use of lines
Making use of lines when taking photos is an absolutely fundamental element which you should always consider. Lines are such an important element of photography that we could easily write a whole post on just this topic, so I’ll try to keep it as concise as possible.
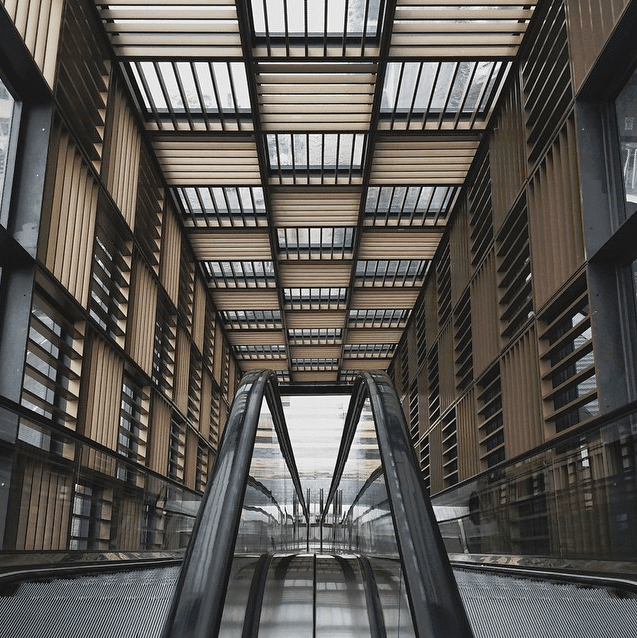
The image above explains a lot about why lines are so important in photography.
The hand railings direct the eye towards the bottom of the steps. Lines can direct attention to a particular area, like in the previous photo of the man on the beach.
The roof and wall shutters disrupt the image. Lines don’t always have to be symmetrical or even, the use of lines in this photo creates a kind of controlled chaos.
The escalator steps provide symmetry. Symmetrical lines can bring balance to a photo and can help when applying the Rule of Thirds to your images.
Insta-tip:
The main thing to take away from this tip is to always have lines in the back of your mind when taking an image. Where are you directing gaze? What kind of mood do you want the photo to express? The more you get into this habit, the better your photos will become.
#5. Black and White imagery
In order to diversify your Instagram profile further, try using black and white imagery every so often.
Most people would agree that black and white photos can look pretty amazing, but why is that? The style of shot is extremely versatile, you can use it for almost any type of photo (landscape, cityscape, portraits etc.) and when executed correctly it can create a previously average photo into an amazing one.
Black and white photography can also be used to alter the mood of a photo. If your aim is to create a solemn or serious mood with your image, try out black and white effects to see whether this makes a difference.
Sometimes you’ll get a great shot but the lighting is terrible. Changing the colour scale to black and white will often stop this from being a problem as lighting is not as crucial in this style of photo.
Insta-Tip:
Try out black and white imagery every so often to mix up your profile. Don’t just stick to the same type of image, try it out on people, buildings or landscapes and see which looks best.
#6. Fill the frame
We talked earlier about using space. However, there are some cases where you can fill the frame with detail. If the subject you are trying to capture has a lot happening within it, you don’t always need to shy away from adding everything into one photograph.
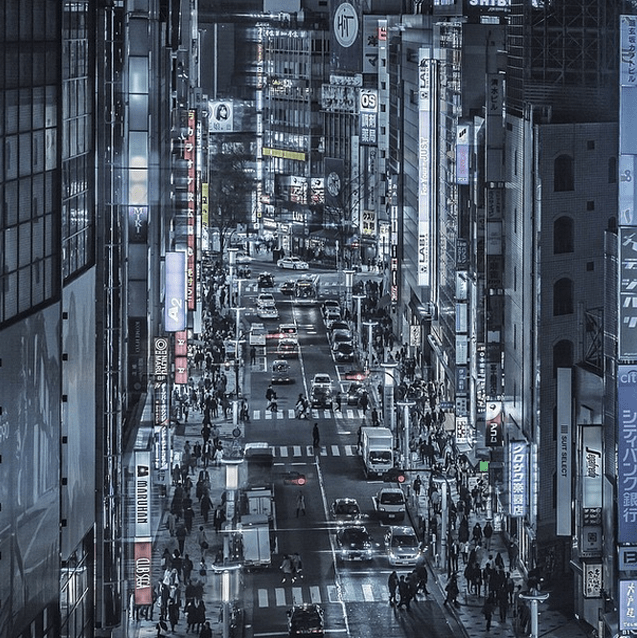
The above photo is a great example of how filling the frame can make an image really engaging as there is so much going on. Your eye isn’t drawn to any particular area, which means the viewer can take more time to look at the different details and people within the scene.
Alternatively, if you are taking a picture of a person and want to ensure you convey their emotions, filling the frame with their face is a good way to do this.
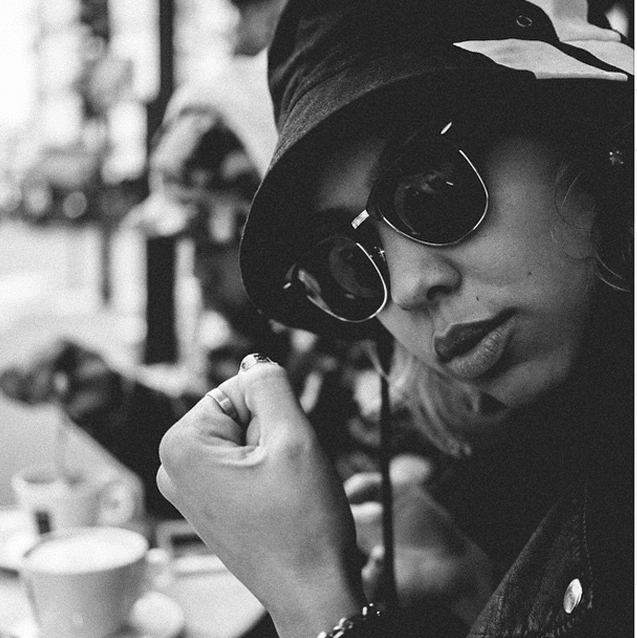
Here there is no doubt what the main subject of this photo is. If you want the viewer to solely focus on a person’s face or emotions, fill the frame with their image.
You can also use this technique where the image has an overcrowded background. By focussing on the foreground, everything behind the main subject becomes less noticeable.
Insta-tip:
Fill the frame when you want to focus on one subject or if there is a lot of detail in the image you are taking. Instagram is full of landscape shots of natural surroundings or buildings, so filling the frame can set yourself apart from other profiles.

Now we’ve gone through some of the basics of photography, what else can you do to improve your Instagram shots? There are loads of tools out there which will help you with some of the techniques we’ve discussed, and here are our favourites.
Photo Editing Apps

When it came to talking about our favourite apps, VSCOCAM was the first one that sprung to mind. The app gives you far more freedom compared to standard Instagram filters, plus you are able to fine tune your images with adjustments for exposure, temperature, contrast and more. Search #vsco and #vscocam on Instagram to give you some inspiration.

Another great photo editing app is Snapseed. The app is similar to VSCOCAM, however the additional Selective Adjust feature allows you to pinpoint certain areas on a photo and change the brightness, contrast and saturation without altering the rest of the image. There are also a number of built in filters such as Black & White, HDR (High Dynamic Range) scape, Tilt-Shift and Vintage.
Overlay Apps

Sometimes you’ll want to add other elements to your photographs. In this instance, Over allows you to add text to your images. There are tonnes of different designs and fonts, so you’ll be sure to find the right one for your picture. If you want to add shapes or patterns, Tangent is your best option as there are loads of different designs which you can include as overlays on your images. Both of these apps cost £1.49, we think it’s worth it.
GPS Location Apps

If you’ve taken a photo on your DSLR and transferred it over to your iPhone, chances are you can’t tag the photo on your ‘Photo Map’ on Instagram. With Korekodo you can now add a location to a photo that previously didn’t have one. This is great for people who travel around a lot and want people to know about it!
You’ve read the tips and downloaded the apps, but now you need some inspiration. There are tonnes of amazing photographers on Instagram, so narrowing them down to a few was tricky. Below are some of Instagram profiles which we aspire to be like!
Robert Jahns (@nois7) is an amazing digital artist who creates out of this world images. His photos are so full of colour and depth you can easily spend your lunch hour scrolling through his profile.
Brock Davis’ (@brockdavis) profile is a completely different approach to photography. He manages to take amazing photos through every day objects, using his creativity to express them in a completely different way.
Yoshito Hasaka (@_f7) is the profile you want to see if you want to learn more about filling the frame and symmetry. With lots of cityscapes and structural photos, you can learn a lot from his photos.
Trashand‘s Instagram profile is too difficult to pin down in one sentence, which is why we like it. There’s a great variety of incredible photography on show there, which is probably why they have nearly four hundred thousand followers!
If you’re looking to focus more on natural photography, Oliver Vegas (@ovunno) is the profile for you. We challenge you to go through his photos and not want to jump on the next plane to the middle of nowhere straight after.
Summary
After working on our company profile for a couple of months now, the one thing I’ve learnt is that you’ll always keep learning about photography. The best thing to do is to go out there and start taking photos, using some of the techniques we’ve talked about today.
